How to Take a Screenshot in Windows: In today’s digital world, screenshots have become an essential tool for communication, documentation, tutorials, troubleshooting, and content creation.
Whether you’re a student, blogger, business owner, freelancer, or remote worker, knowing How to Take a Screenshot in Windows 10 and newer versions like Windows 11 is a vital skill.
From capturing full screens and specific windows to editing and sharing screenshots instantly, Windows provides several built-in tools and keyboard shortcuts to make the process fast and efficient.
In this detailed post guide, you’ll learn:
- How to take a screenshot using keyboard shortcuts
- How to use Snipping Tool and Snip & Sketch
- How to capture scrolling screenshots
- How to edit and save screenshots
- How to troubleshoot screenshot issues
- Best third-party screenshot tools
- Advanced tips for professionals
Let’s dive in.
ALSO READ: PDF Editors Free Download – Simple PDF Editing Tools
Why Screenshots Are Important in Windows
Before we go deep into How to Take a Screenshot in Windows 10, it’s important to understand why screenshots matter:
- Create tutorials and guides
- Report software bugs
- Share payment confirmations
- Capture online receipts
- Save social media content
- Create visual blog posts
- Document important information
If you run a blog, manage social media, or work remotely, screenshots save time and improve communication clarity.
How to Take a Screenshot in Windows 10 Using Keyboard Shortcuts
Keyboard shortcuts are the fastest and most convenient way to capture screenshots in Windows 10 and newer versions.
Let’s explore each method in detail.
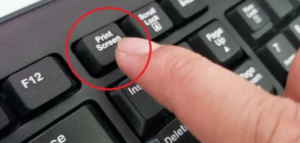
How to Take a Screenshot in Windows 10 Using the Print Screen (PrtScn) Key
The simplest way to capture your entire screen is by using the Print Screen (PrtScn) key.
Step-by-Step Guide:
- Locate the PrtScn key on your keyboard (usually top right).
- Press it once.
- Open an app like Paint or Word.
- Press Ctrl + V to paste.
- Save the file.
What Happens?
- It captures the entire screen.
- The screenshot is copied to your clipboard.
- You must paste it into an app before saving.
Best For:
- Quick full-screen captures
- Copying screen content into documents
How to Take a Screenshot in Windows 10 Using Windows + Print Screen
If you want Windows to automatically save your screenshot, use:
Windows Key + PrtScn
Steps:
- Press Windows + PrtScn
- Your screen will dim briefly.
- Screenshot is automatically saved.
Where Is It Saved?
Go to:
This PC > Pictures > Screenshots
This method saves time because you don’t need to paste manually.
How to Take a Screenshot in Windows 10 of an Active Window (Alt + PrtScn)
Sometimes you only want to capture the active window, not the whole screen.
Steps:
- Click the window you want to capture.

- Press Alt + PrtScn
- Open Paint.
- Press Ctrl + V
- Save the image.
This is perfect for:
- Capturing browser windows
- Capturing software error messages
- Creating tutorials
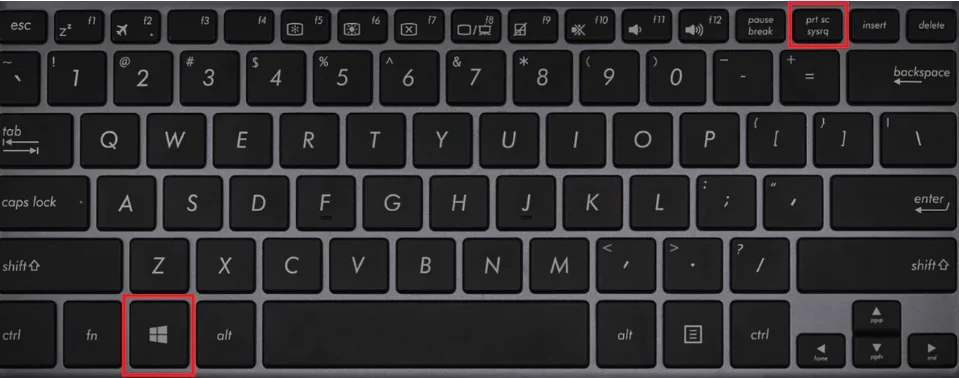
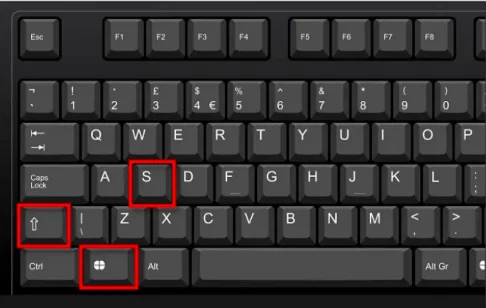
How to Take a Screenshot in Windows 10 Using Windows + Shift + S
This shortcut opens the built-in snipping feature.
Press:
Windows + Shift + S
Your screen will dim and a mini menu will appear at the top.
You can choose:
- Rectangular Snip
- Freeform Snip
- Window Snip
- Full-screen Snip
After selecting, the image goes to your clipboard. A notification appears allowing you to edit and save it.
This is one of the most powerful built-in screenshot tools in Windows 10 and Windows 11.
ALSO READ: SHAREit Free Download for Android, iOS, Windows PC
How to Take a Screenshot in Windows 10 Using the Snipping Tool
Windows includes a built-in application called the Snipping Tool.
What Is the Snipping Tool?
The Snipping Tool is a screenshot application included in Windows that allows you to capture specific parts of your screen.
How to Open Snipping Tool
- Click Start.
- Type “Snipping Tool”.
- Click the app.
Or use:
Windows + Shift + S (modern shortcut alternative)
Snipping Tool Modes
When learning How to Take a Screenshot in Windows 10, understanding snip modes is important.
1. Rectangular Snip
Capture a rectangular section.
2. Free-form Snip
Draw any shape to capture.
3. Window Snip
Capture a specific window.
4. Full-screen Snip
Capture entire screen.
How to Save Screenshot in Snipping Tool
- Click “New”
- Capture area
- Click “File”
- Choose “Save As”
- Select location and file type (PNG, JPG, GIF)
How to Take a Screenshot in Windows 10 Using Snip & Sketch
Snip & Sketch replaced the classic Snipping Tool in newer versions.
It provides:
- Better editing tools
- Delay timer
- Easy sharing
- Touch support
How to Open Snip & Sketch
Method 1:
Press Windows + Shift + S
Method 2:
Search “Snip & Sketch” in Start Menu.
Using Delay Timer in Snip & Sketch
If you need to capture dropdown menus:
- Open Snip & Sketch
- Click the arrow next to “New”
- Choose delay (3 or 10 seconds)
- Prepare your screen
- Capture
This is extremely helpful when documenting menus.
How to Take a Screenshot in Windows 10 and Automatically Edit It
After capturing, editing improves clarity.
Snip & Sketch offers:
- Highlighting
- Drawing
- Cropping
- Touch writing
- Zooming
For advanced editing, use:
- Microsoft Paint
- Paint 3D
- Canva (online)
- Photoshop
How to Take a Screenshot in Windows 10 for Gaming
Gamers can use the Xbox Game Bar.
Press:
Windows + G
Then click the camera icon.
Or use:
Windows + Alt + PrtScn
Screenshots are saved in:
Videos > Captures
Perfect for:
- Capturing gameplay
- Creating YouTube thumbnails
- Sharing game highlights
How to Take a Screenshot in Windows 10 of a Scrolling Page
Windows does not natively support full scrolling screenshots.
For full web page capture, use browsers:
Google Chrome
Install extensions like:
- GoFullPage
- Awesome Screenshot
Microsoft Edge
Edge now supports full-page capture:
- Press Ctrl + Shift + S
- Choose “Capture Full Page”
This works perfectly for blog documentation.
How to Take a Screenshot in Windows 11 (Newer Versions)
Windows 11 works similarly to Windows 10.
The Snipping Tool in Windows 11 combines both classic Snipping Tool and Snip & Sketch.
Main shortcut remains:
Windows + Shift + S
Windows 11 also allows:
- Screen recording
- Improved editing interface
- Modern UI
If you know How to Take a Screenshot in Windows 10, you already understand Windows 11.
READ ALSO: Link Website to Social Media: Easy Setup Guide
Where Are Screenshots Saved in Windows?
Location depends on method used:
| Method | Save Location |
|---|---|
| PrtScn | Clipboard only |
| Windows + PrtScn | Pictures > Screenshots |
| Game Bar | Videos > Captures |
| Snipping Tool | Manual save |
| OneDrive (if enabled) | OneDrive > Pictures |
Troubleshooting Screenshot Problems in Windows 10
Sometimes screenshot shortcuts don’t work.
Common fixes:
1. Check Keyboard
Ensure PrtScn key works.
2. Update Windows
Go to:
Settings > Update & Security > Windows Update
3. Check Clipboard
Press:
Windows + V
4. Enable Print Screen Shortcut
Go to:
Settings > Accessibility > Keyboard
Enable:
“Use the Print Screen button to open screen snipping”
Best Third-Party Screenshot Tools for Windows
If you need advanced features, consider:
1. Lightshot
Simple and fast.
2. Greenshot
Great for professionals.
3. Snagit
Premium tool with editing features.
4. ShareX
Free and feature-rich.
These tools offer:
- Scrolling capture
- Automatic upload
- Annotation tools
- OCR text recognition
How to Take a Screenshot in Windows 10 for Professional Use
If you’re a blogger or business owner, here’s how to optimize screenshots:
1. Use High Resolution
Avoid blurry images.
2. Crop Unnecessary Areas
Focus on important sections.
3. Add Highlights
Use arrows and boxes.
4. Compress Images
Use tools like TinyPNG to improve website speed.
5. Rename Files Properly
Example:
how-to-take-screenshot-in-windows-10.png
This improves SEO ranking.
SEO Tips for Using Screenshots on Your Website
Since you’re publishing this post on your website, optimize screenshots by:
- Adding ALT text
- Using descriptive file names
- Compressing images
- Using WebP format
- Adding captions
This improves:
- Google image ranking
- Page speed
- User engagement
Frequently Asked Questions (FAQ)
How do I take a screenshot without Print Screen?
Use:
Windows + Shift + S
How do I take a screenshot on a laptop?
Use:
Fn + PrtScn (if required)
How do I screenshot only one monitor?
Select the window manually using Windows + Shift + S.
How do I change screenshot location?
Right-click the Screenshots folder > Properties > Location > Move.
Conclusion
Learning How to Take a Screenshot in Windows 10 is a fundamental digital skill in 2026. Whether you are using keyboard shortcuts, Snipping Tool, Snip & Sketch, or third-party tools, Windows provides multiple options tailored to your needs.
From beginners to professionals, mastering these methods will:
- Improve productivity
- Simplify communication
- Enhance content creation
- Support troubleshooting
- Boost website SEO
Now that you understand How to Take a Screenshot in Windows 10 & Newer Versions, you can confidently capture, edit, save, and share screen content efficiently.